The SU Type H is a variable-venturi, constant-vacuum carburettor with very few moving parts, simple, reliable, and once correctly set it stays set. Tuning follows a fixed order: prepare the engine, set the jets to a datum, balance the throttles, set the mixture, then confirm with the lifting-pin test. This guide covers tuning, servicing and fault-finding in full.
On this page
- Know your carburettor
- How it works
- Before you touch the carburettors
- Tuning a single carburettor
- Tuning twin carburettors
- Reading the mixture
- Damper oil
- Choke and fast idle
- Needles and jets
- Servicing
- Dismantling and reassembly
- Fault diagnosis
- Modern practice and upkeep
This article is the reference companion to the Complete MG T-Series Tune-Up, the Ignition and Charging guide, the SU Electric Fuel Pump diagnostic article and the Cooling and Overheating guide. When a specialist is needed, the Parts and Specialists directory lists trusted UK options.
Know your carburettor
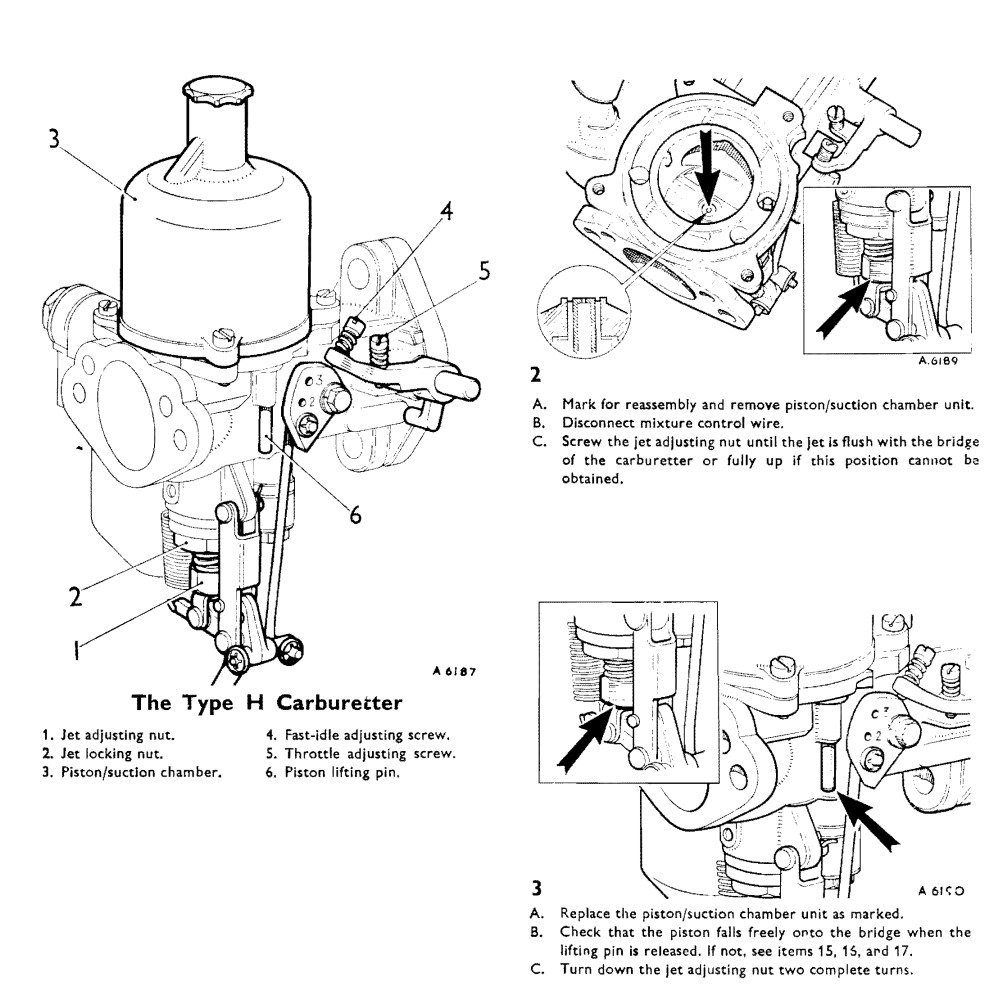
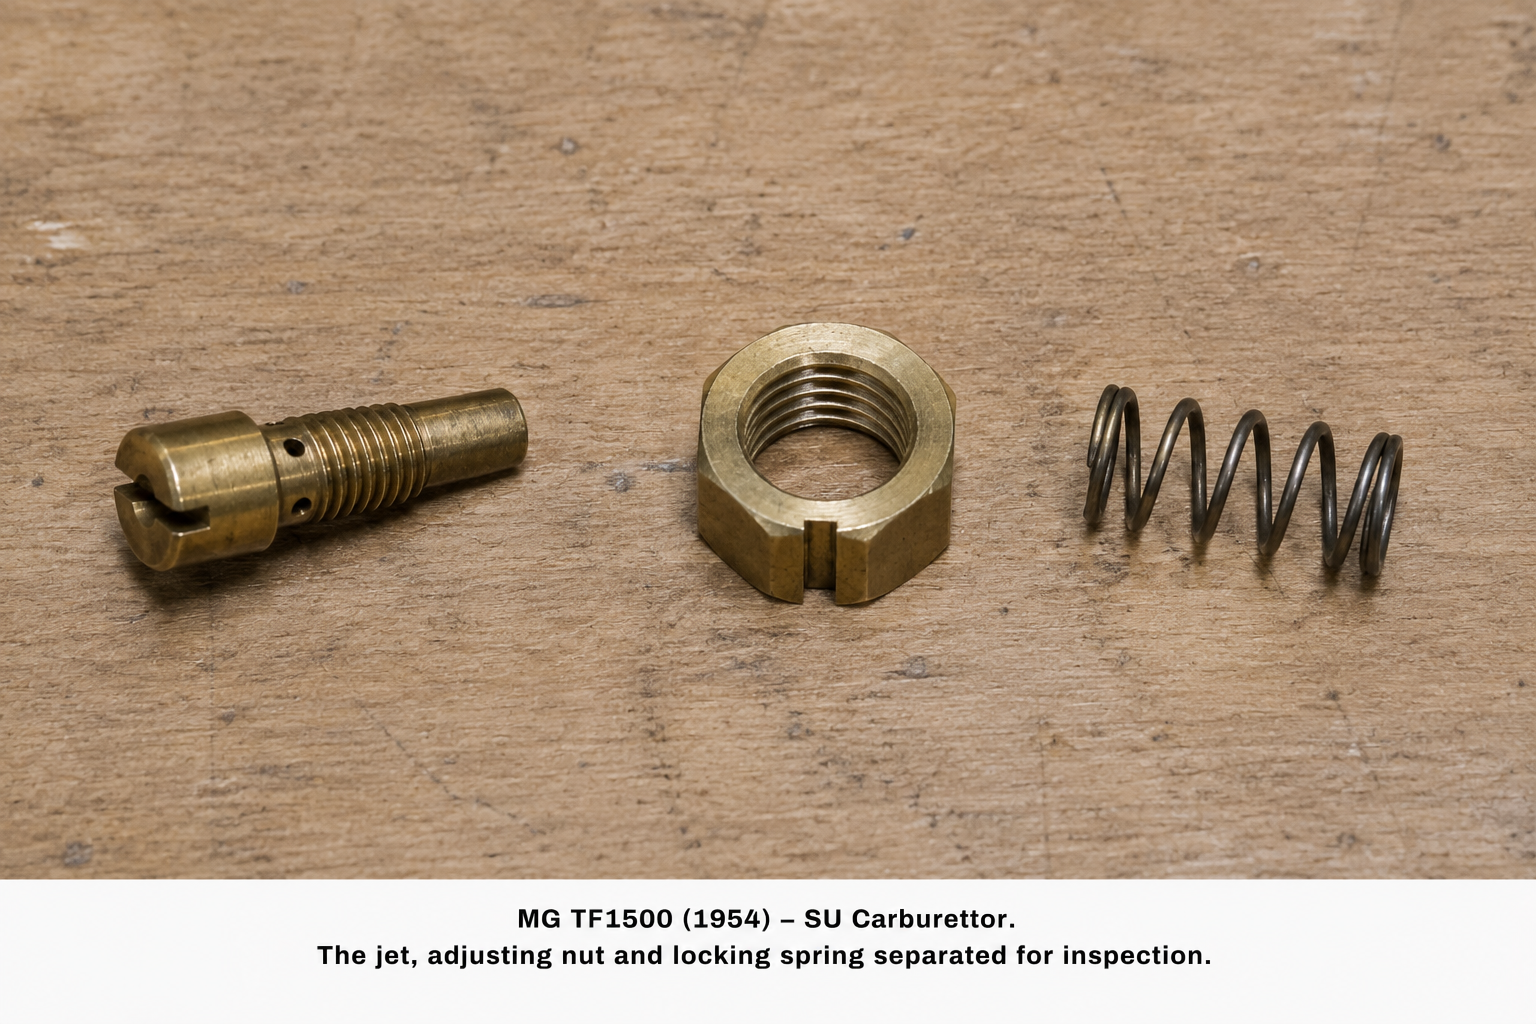
Before any adjustment, learn the six controls this guide refers back to. On a standard T-Series installation each carburettor has: a jet adjusting nut that raises or lowers the jet to set mixture, a jet locking nut that clamps the jet bearing during centring, a piston and suction chamber that ride over the bridge and carry the needle, a fast-idle adjusting screw that props the throttle open slightly when the choke is pulled, a throttle adjusting screw that sets normal idle speed, and a piston lifting pin used only to read the mixture.
T-Series cars run twin H-type carburettors, so every adjustment is done twice and in balance. Confirm the exact type and size fitted to your car before ordering parts, later HS-type carburettors are sometimes found as replacements, and their adjustment details differ slightly from the original H.
How it works
Airflow lifts a piston inside the suction chamber, varying the size of the venturi and keeping the depression over the jet roughly constant across the rev range. A tapered needle attached to the piston rises with it, so as the piston lifts, the effective area of the jet opens progressively, richer at higher airflow, leaner at lower.
An oil-filled damper slows the piston's rise on a sudden throttle opening. That momentary lag briefly increases depression over the jet and enriches the mixture, the SU's elegant substitute for an accelerator pump. Crucially, there is no separate idle circuit; the same jet feeds the engine from idle to full throttle. That is why an SU with sound parts needs so little fiddling: there are simply not many things to get wrong once it is set.
Before you touch the carburettors
Before adjusting anything, satisfy yourself that:
- Compression is sound and even across all four cylinders.
- Valve clearances are set to the correct hot or cold figure for your engine, verify against the workshop manual.
- Contact-breaker points, plugs and ignition timing are within specification, and the distributor advances properly.
- There are no air leaks, especially worn throttle spindles, perished manifold gaskets, or a leaking balance pipe between the two carbs.
Then gather your tools: a carburettor airflow or balance meter, correct spanners and screwdrivers, feeler gauges, a jet-centring tool or suitable substitute, a can of SAE 20 damper oil, a rev counter or dwell meter, and, if you have one, a Colortune plug for reading the mixture visually.
Tuning a single carburettor
The single-carb procedure is the baseline; the twin routine on the next page just does everything twice, in balance. Verify all figures against the workshop manual for your specific car.
- Mark the suction chamber and body so it goes back in the same orientation, remove the piston and suction chamber as a unit, and disconnect the choke cable at the jet lever.
- Screw the jet adjusting nut up until the jet is flush with the bridge of the carburettor, or as far up as it will go if flush cannot be reached.
- Refit the piston and suction chamber as marked. Release the lifting pin: the piston should drop onto the bridge with a clean metallic click. If it does not, the jet needs re-centring before going any further (see Servicing).
- Wind the jet adjusting nut down exactly two full turns from flush. This is your starting datum.
- Warm the engine thoroughly to normal running temperature, then switch off. Back the throttle adjusting screw off until it is just clear of its stop with the throttle closed, then wind it back in about 1½ turns.
- Restart and set the idle with the throttle adjusting screw to the speed specified for your car. For a T-Series this is typically in the region of 700–800 rpm; the generic SU literature quotes 500–600 rpm, so follow your car's manual.
- Turn the jet adjusting nut up to weaken or down to richen, one flat at a time, until the idle is at its fastest and steadiest. Readjust the throttle screw to bring the idle back to the correct speed, and repeat until both are right together.
Tuning twin carburettors
This is the main event on a T-Series. The steps are the single-carb routine done twice in balance, with the linkages temporarily uncoupled so each carb can be set independently.
- Remove the air cleaners and set the jet datum (steps 1 and 2 above) on both carburettors.
- Slacken one clamping bolt on the throttle-spindle interconnection so the two throttles can move independently, then disconnect the jet-control linkage by removing a swivel pin so the jets are independent too.
- Do the piston-drop click test on both. If either fails, centre that jet before continuing.
- Wind both jet nuts down two full turns as before, warm the engine to full temperature, and set both throttle screws to give the specified idle.
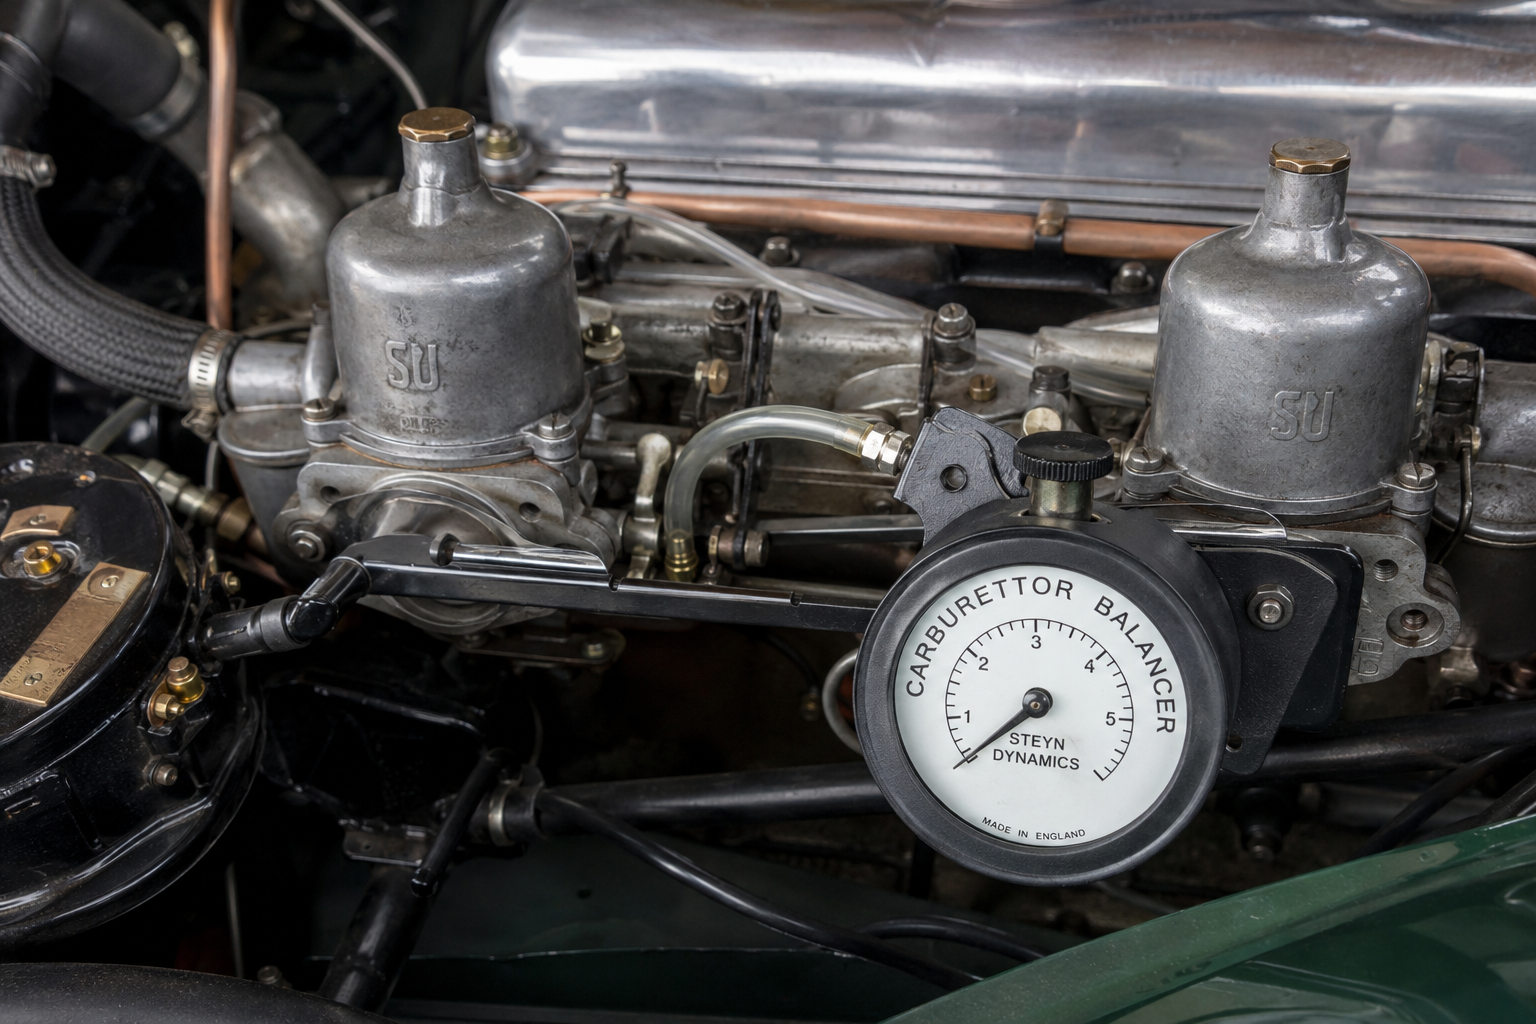
- Balance the throttles. The traditional method was to compare the intensity of the intake hiss by ear, a length of tube used as a stethoscope was the workshop trick. It works, but the modern method is far more accurate: fit an airflow or balance meter over each intake in turn and adjust the throttle screws until both carburettors draw exactly the same airflow, always moving each screw by the same amount.
- Set the mixture. Turn both jet adjusting nuts by the same amount, up to weaken, down to richen, until the idle is at its fastest and steadiest. On twin carbs the adjustments are interdependent, so expect several passes.
- Confirm with the lifting-pin test on each carburettor in turn, re-checking the first after adjusting the second.
- Retighten the throttle-spindle clamp bolt and set the linkage so its pin rests against the edge of the pick-up lever hole. That small clearance gives the correct slight delay before the front throttle opens. Reconnect the jet linkage so both jets start to move together.
- Refit the air cleaners and re-check the mixture, clean air cleaners slightly richen it, so a small correction is normal.
Reading the mixture
Two independent checks let you decide whether the mixture is right without a rolling road. Use them together.
| Check | Correct | Rich | Weak |
|---|---|---|---|
| Lifting-pin test, raise the piston about 1/32 in (0.8 mm) | Idle rises very slightly, then settles back | Idle rises noticeably and stays up | Idle drops immediately; engine may stall |
| Exhaust note and colour | Regular, even note; light-grey to colourless exhaust | Regular or rhythmic misfire; blackish smoke | Irregular, splashy misfire; colourless exhaust |
A Colortune plug is a useful cross-check: a clean blue flame at the plug tip is correct, yellow indicates rich, and white indicates lean. Reading the plugs themselves after a decent run confirms the picture over time.
Damper oil
The damper is not optional. Without oil in it the piston rises too quickly on throttle openings and the engine hesitates or stumbles. Use a thin engine oil, SAE 20 is the standard recommendation.
| Dashpot type | Identifying feature | Oil level |
|---|---|---|
| Standard vented | Vent hole in the damper cap | About 1/2 in (13 mm) above the top of the hollow piston rod |
| Dust-proofed | Transverse hole in the neck of the suction chamber; no vent in the cap | About 1/2 in (13 mm) below the top of the rod |
Some references simply describe filling to within about 1/2 in of the top of the rod, so identify which type is fitted to your car and verify against its workshop manual. The cap must match the dashpot, you want one vent, not two, and not none.
Choke and fast idle
Reconnect the mixture-control cable leaving about 1/16 in (1.6 mm) of free movement before it begins to pull on the jet lever. That small slack lets the jets return fully to their running position when the choke knob is pushed home.
Then pull the knob out until the linkage is just about to move the jets, and set the fast-idle screw against its cam to give around 1,000 rpm on a single carb, or 1,000–1,200 rpm on a twin installation, with the engine hot. On twin carbs, check that both jets drop together and that both return fully against their adjusting nuts under spring pressure, a drop of light oil on the linkage pins keeps this honest.
Needles and jets
The needle profile is chosen during engine development and is correct for a standard engine in normal conditions. Two situations call for a change: sustained running at high altitude (above roughly 6,000 ft / 1,800 m), where a weaker needle is fitted; and engine modifications (camshaft, compression ratio, air cleaner or exhaust changes), which may need a different needle to suit the new airflow.
To check: remove the piston and suction chamber, slacken the needle locking screw, withdraw the needle and read its identification mark. Refit it so the shoulder on the shank is exactly flush with the face of the piston, then tighten the locking screw.
T-Series specifics, verify against the workshop manual for your car:
| Item | Typical figure |
|---|---|
| Standard needle for normal running | Commonly marked ES |
| Standard jet | 0.090 in, head marked "9" |
| Oversize jet (usually wrong for a standard engine) | 0.100 in, head marked "1" |
| Piston return spring, TD Mk II | Red |
| Piston return spring, TF and TF 1500 | Blue |
The later T-Series cars run badly without their return springs, so if the pistons feel oddly light when lifted by hand, check the springs are present and correct.
Servicing
Three routines cover almost everything the H-type needs in service.
Cleaning the piston and suction chamber
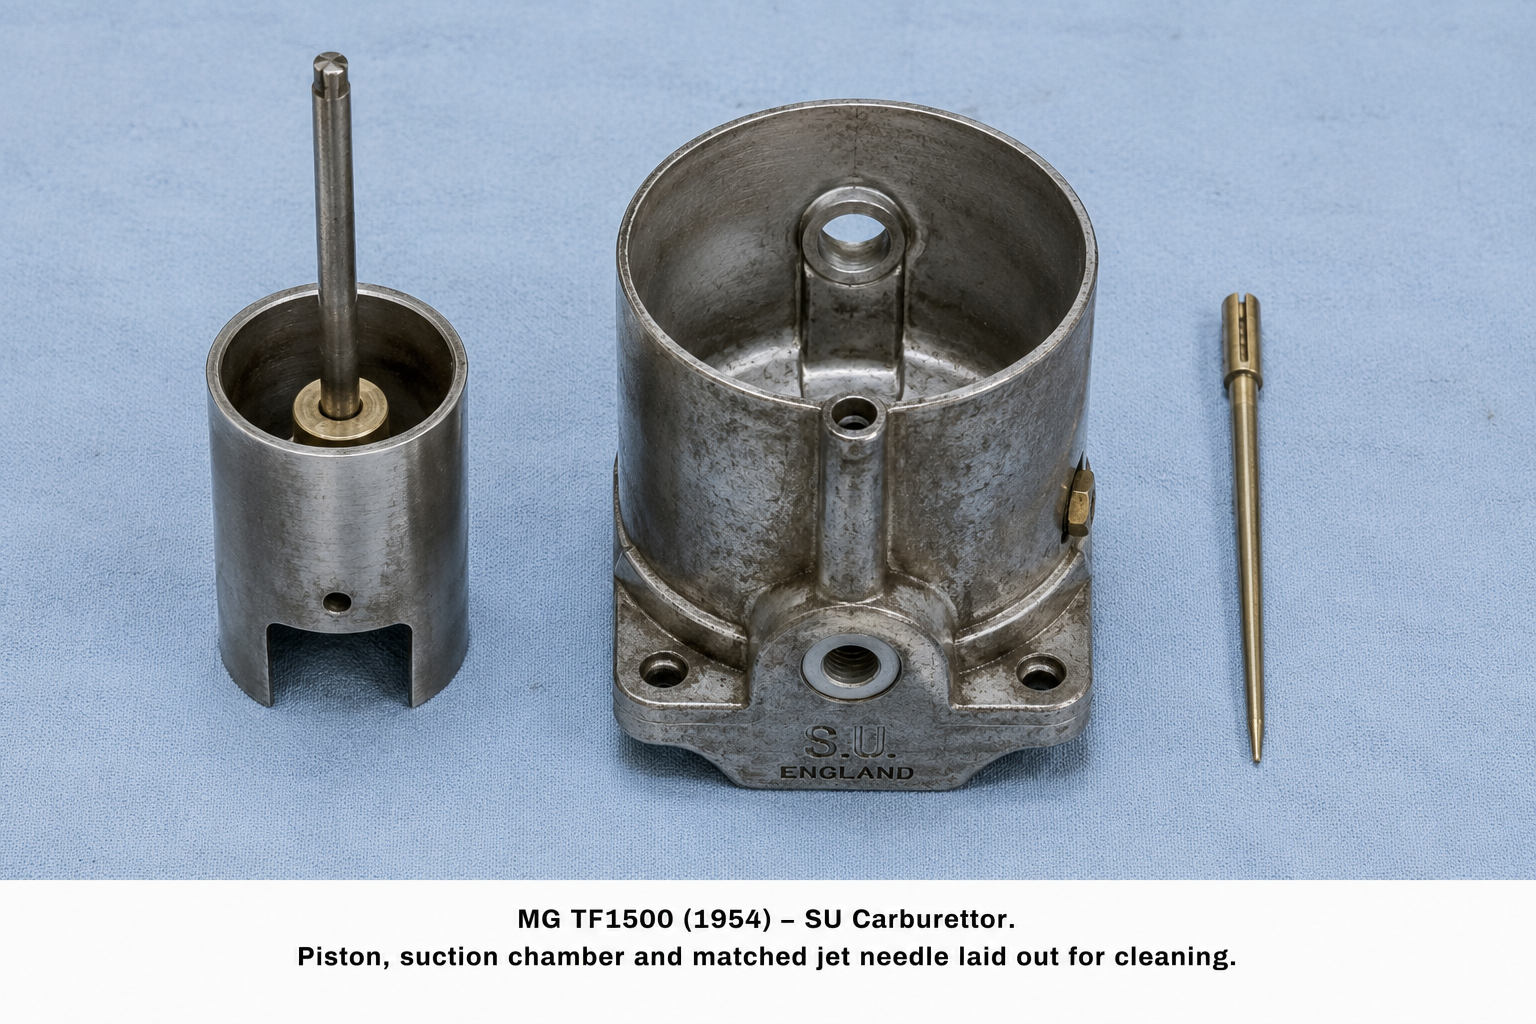
Do this at every service, or at least annually. Mark the chamber to the body so it goes back the same way, remove the piston and chamber carefully together, and clean the bore of the chamber and both diameters of the piston with a petrol-moistened cloth. Never use abrasives, the parts are a precision fit and any scoring destroys the seal.
Lightly oil the piston rod only, not the piston sides, and refit as marked. Listen as the piston slides down: any scraping means a burr or nick that should be dressed flush before the carb is trusted again.
Centring the jet
The test is simple. With the jet fully up, release the lifting pin, if the piston drops onto the bridge with a clean metallic click, the jet is centred. If it only clicks properly with the jet fully lowered, the jet is off-centre and the needle is dragging in it.
To centre it: swing the jet linkage aside, mark and withdraw the jet, remove the jet locking spring, refit the adjusting nut and wind it fully up. Refit the jet keeping the slot in the head correctly oriented, then slacken the jet locking nut until the whole assembly can rotate. Remove the damper and press lightly down on the piston rod (a pencil against the top of the rod works well) so the piston sits firmly on the bridge, and retighten the jet locking nut while the jet is held hard up against the adjusting nut. Refit the damper and re-test the click, both with the jet fully up and fully down. A sharper click in one position means the procedure needs redoing until the click is equal in both. Reassemble the controls and top up the damper.
Checking the float level
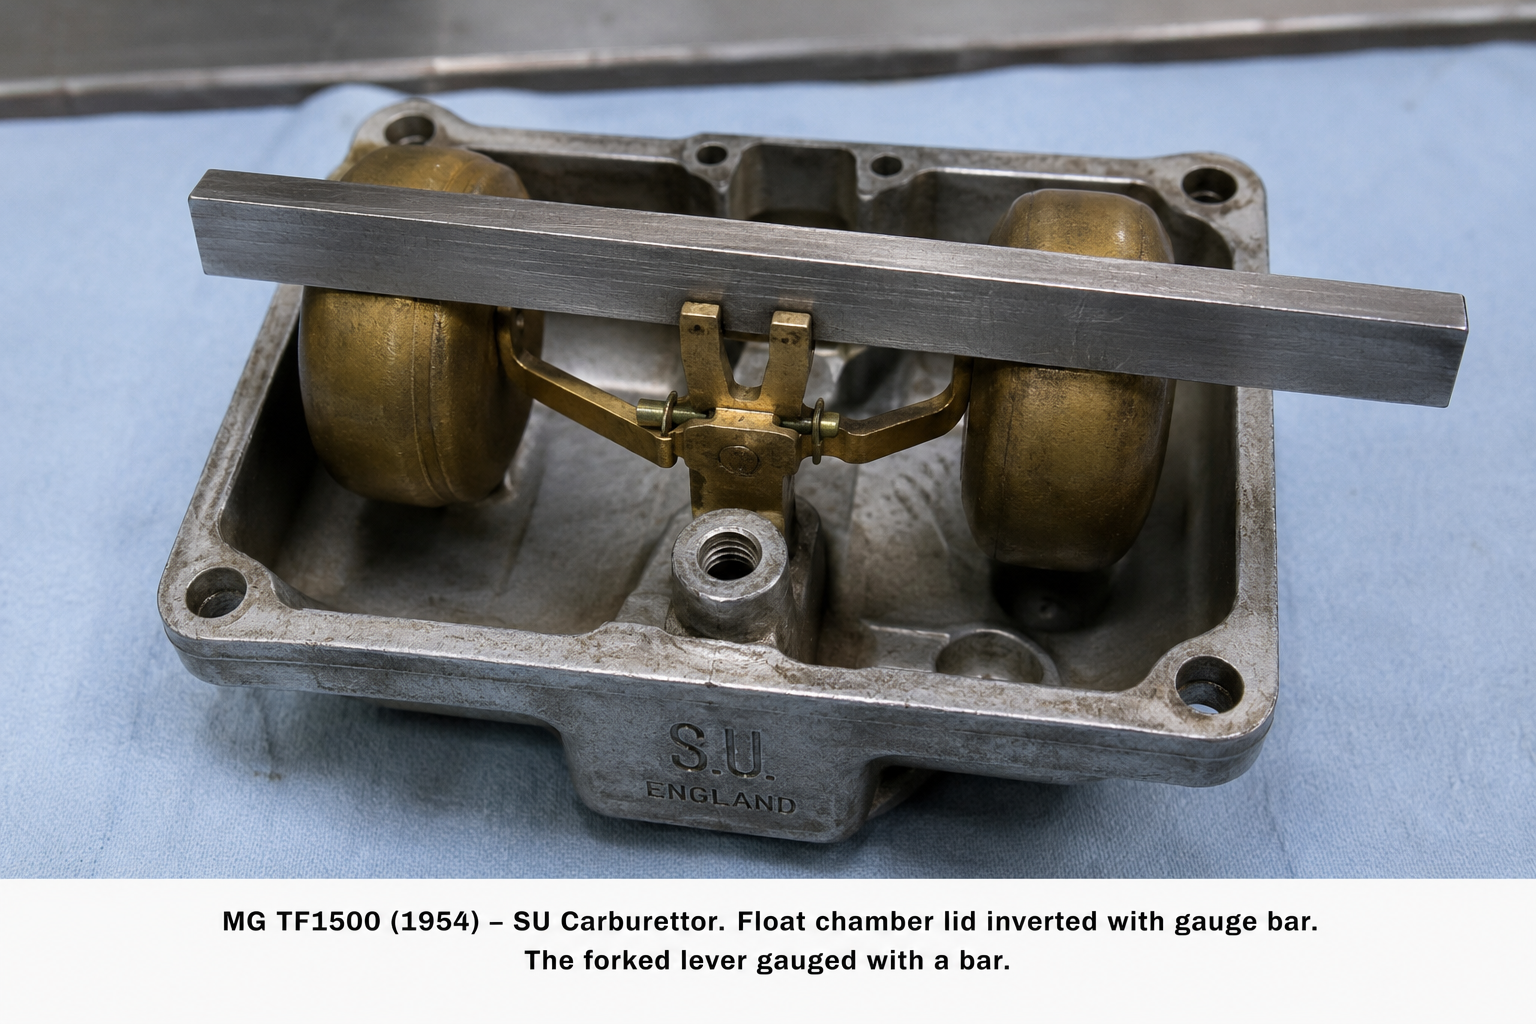
Remove the float-chamber lid and invert it, with the needle resting on its seat. Place a round bar of about 7/16 in (11 mm) diameter between the forked lever and the lip of the lid, the prongs should just touch the bar. If they do not, bend the lever carefully at the fork until they do, keeping the straight section straight and both prongs even.
MG literature sometimes quotes a 3/8 in fuel level below the jet bridge as the datum; either figure gives an acceptable level. The practical test is that with the jet fully down, fuel sits above the jet head and below the bridge, never overflowing, never dry.
Dismantling and reassembly
A full strip is beyond the scope of this article, but the key cautions below apply whenever the carbs come apart.
- Mark the suction chamber to the body before separating.
- Lift the chamber straight off without tilting, a tilted lift bends the needle.
- Keep track of the piston spring and any thrust washer under it.
- When a needle sticks, tap it inwards first and pull it straight out rather than bending it against the piston.
- On the jet assembly, the washer sits under the shoulder of the lower jet bearing, the coned faces of the gland washers face the gland packing, and the copper washer sits with its sharp edge towards the upper jet bearing.
- Leave the jet locking nut slack until the jet has been re-centred against a piston sitting on the bridge.
- Do not disturb the cork washer under the jet locking nut.
- The throttle disc is oval, mark its position before removal, refit with two new screws, and spread the split ends of the screws so they cannot back out.
- With the throttle spindle out, check the spindle and its bearings for wear; a worn spindle is a permanent air leak and no tune will hold.
Inspect every component before reassembly and renew anything worn. Use new split pins and new fibre washers throughout, they cost pennies and stop the small leaks that make a good tune elusive.
Fault diagnosis
Use this as a starting point, but keep the pre-tune checks (compression, ignition, air leaks) in mind, many of the symptoms below have a mechanical or ignition cause that no carburettor adjustment will cure.
| Symptom | Likely cause | Remedy |
|---|---|---|
| Erratic running, stalling at idle, lack of power, high fuel consumption | Sticking piston; dirty piston or suction chamber; jet out of centre; bent needle | Clean piston and bore; re-centre jet; renew needle if bent |
| Too rich at idle, or fuel weeping at the jet | Worn top or bottom jet gland; dirt under the top gland washer | Renew glands; clean and refit |
| Float chamber or jet flooding | Incorrect fuel level; dirty or worn needle valve; punctured float | Reset level; clean or renew needle valve; renew float if it rattles or slosh-shakes |
| Won't idle slowly, won't lean out | Air leak past worn throttle spindles, gaskets or the balance pipe; incorrect needle position; leaking float valve | Cure the air leak first; re-check needle position; renew float valve |
| Jet nuts more than about two turns apart on a twin installation | Float level, needle position, or worn jet on one side | Re-check float level, needle, and jet size on both carbs |
Modern practice and upkeep
The H-type is one of the easiest carburettors on any classic engine to live with, provided a light service schedule is kept up.
- Top up the damper oil regularly, a check with the oil dipstick at every service is enough.
- Clean the pistons and suction chambers annually or at every major service.
- Check the float level and jet centring when tuning; do not assume they are still right after a rebuild elsewhere in the fuel system.
- Renew gland and gasket seals when the carbs are disturbed.
Modern ethanol-blended petrol attacks period rubber and slightly richens the effective mixture the original needle profile was cut for. Where possible, run E5 super unleaded, and replace any perished fuel lines with ethanol-resistant hose.
SU carburettors and parts remain in current manufacture, so genuine spares, needles, jets and rebuild kits are readily available. Rather than name a single supplier, the Parts and Specialists directory lists trusted UK options.
---
*Reference information adapted from SU's Type H tuning and servicing literature and established T-Series practice; verify settings for your own car.*
Frequently asked questions
How do I tune twin SU carburettors?
Warm the engine fully, set each jet to a datum (flush with the bridge, then two flats down), disconnect the throttle and jet linkages so each carb is independent, balance the airflow with a meter, then set the mixture on both jets equally until the idle is fastest and steadiest. Confirm with the lifting-pin test on each carburettor, reconnect the linkages, and re-check. Verify every figure against the workshop manual for your car.
What oil goes in SU dashpots?
A thin engine oil, SAE 20 is the standard recommendation. On vented dashpots, fill until the level is about 1/2 in above the top of the hollow piston rod; on dust-proofed types identified by a hole in the neck of the suction chamber, fill to about 1/2 in below the top of the rod.
How do I know if my SU mixture is right?
Use the lifting-pin test: raise each piston about 1/32 in with the pin. A brief rise then a settle back means the mixture is correct; a lasting rise means it is rich; an immediate drop or a stall means it is weak. Confirm with the exhaust note and, if you have one, a Colortune reading.
How do I centre an SU jet?
With the jet fully up, slacken the jet locking nut, apply light downward pressure on the piston rod so the piston sits on the bridge, then retighten the locking nut. Check that the piston still drops with a clean metallic click when the lifting pin is released with the jet both fully up and fully down; if it clicks better in one position, redo the procedure.
What does the lifting pin do?
It lets you raise the piston a fraction independently of airflow so you can read the mixture: the response of the idle to that tiny lift tells you whether the carb is running rich, correct or weak. It is not used during normal running.
Why won't my SU carbs idle?
SUs have no separate idle circuit, so an unstable idle almost always traces back to something outside the carburettor: worn throttle spindles, perished manifold or balance-pipe gaskets, an ignition fault, or uneven compression. Confirm those first; only then re-check jet centring, needle position and float level.